(In its original form first published in 'Tournaments Illuminated')
(This page was updated on the 9th June, 1999, with the kind assistance of Julia, who compressed and tweaked the pictures to make them load quicker. I also added a new cutting diagram from Sara. Many thanks! Any and all comments are welcome - I will add to this page any additional info I am sent.)
(In the article I talk about an Anglo-Saxon type tunic. While the geometric approach to tunics is probably appropriate in the context of Anglo-Saxon garments, I should note that the centre gores front and back probably are not.)
I have an early period persona, and so my garb consists mainly of that universal 'newcomer's garb', the T-tunic. But a T-tunic in period was far from simple. It was a complex garment made up of many pattern-pieces, a far cry from our one-piece, fold-and-sew standard material-waster. This article is the result of some research I've done, and an attempt to put that research into a practical application for the SCA folk who want to be a little more adventurous with that ubiqutous garment.
Like most folk, when I first started out I laid my material out flat and cut around an old shirt. But I soon started looking for other ways of doing it. I felt I was getting very little garb from a lot of material. Even 60" wide material gave me a rather narrow skirt, and it seemed unlikely that someone in period would have been happy with all that wasted material.
In Northern Europe during the Early Middle Ages, most of the textile production was done on the warp-weighted loom or the upright two-beam loom. You weave upwards, have to stand or walk while you're doing it, beating the weft up. You are limited in width to how far you can reach for the spool, since there is no cradle for a shuttle. Even with two weavers (frequently done), you can't produce very wide material.
Now let's be honest here, if you had to do that to produce the fabric for your clothes, would you let a single piece go to waste? I didn't think so either.
Then I was presented with the solution. On my holidays, I went to a reconstructed ringfort on the island of Öland in the Baltic. Apart from a wonderful recreation they also had a well-stocked museum shop. There I found a 'commercial' paper pattern for the only surviving complete Medieval man's outfit, found in the Bocksten bog in Sweden in 1936. It consisted of a pair of hose with 'socks' attached, a tunic, a hood and a cloak. All recovered garments were made of wool, if any linen garments were worn with them they had been destroyed.
The tunic was cut out of 15 pieces. One of the front gussets was pieced together from two triangles. It was probably sewn together with linen thread, since the seams had disintegrated. When reconstructed, the garment looked roughly like this.
I now started making tunics in this way, lengthening the pattern for my woman's gowns. But it was tricky laying out the pattern on the material, and it still seemed to use a lot of material. Then I realised I was working from the wrong angle. The garment was cut from simple, geometrical shapes. So was every other surviving garment from the time. (See Hald) There must be a reason for this, and it had to be economy. With all that effort gone into weaving, sewing was easy in comparison. Bearing in mind that the fabric width was limited, unlike ours that come in 60" widths, I started doodling on paper.
What I came up with in the end was a chart for how to cut a generic T-tunic based on geometrical shapes and a few measurements, that is not only sewn in an authentic way, but also based on the reasoning of why it was done that way. It can be used for almost any northern European persona up until the 14th Century (the Bocksten man was murdered in the mid-fourteenth century), with slight modifications depending on fashion and time. Your social class would determine the material, colour and decoration.
Bear in mind that while the tunic is not particularly difficult to make, it is not a complete beginners' project. Above all, it requires understanding of how to construct a garment. You also need to be able to do insets. If you haven't done a lot of sewing before, you might want to ask an experienced sewer to give you a hand.
I am over 6' tall and hardly skinny, but for a full length underdress with a circumference at the hem of almost 5.5 yards(!), I use just 3.5 yards of 60" wide fabric. It is cheating a little bit, since I doubt that my ancestors would have produced material that wide, but no piece is wider than 40", which is achievable between two weavers. It still works on narrower material, you just lay things out lengthwise instead.
If you want to make an over-tunic, or a gentleman's version, just adjust the length-wise measurements accordingly. I include a second chart for those who want to make an Anglo-Saxon style under-tunic, with tight, overlong sleeves.
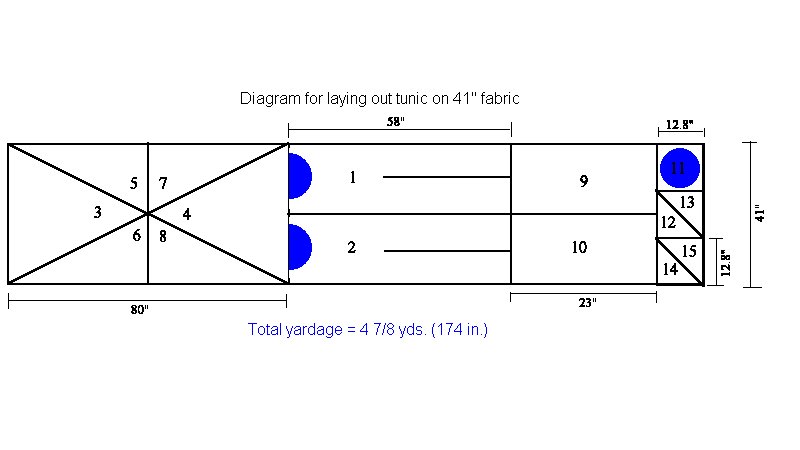
The charts are done more or less to scale. It actually helps if you keep the chart nearby when you mark your material, otherwise it can get confusing. The examples shown are based on my own size, so your charts would not necessarily look quite the same. If you're not sure, rechart them to scale based on your own measurements.
Anglo-Saxon tunic
Patternpieces:
| 1-2 | Main body - front and back (note, these are not cut apart, only folded at the shoulder | 9-10 | Sleeves |
| 3-4 | Front and back inset | 11 | Neck facing |
| 5-8 | Side gores | 12-15 | Under arm gusset (I cut these diagonally for simpler sewing) |
An alternative cutting diagram was sent to me by Sara, another kind person who had read the article and had a play with the geometry of it all.
 .
.
The important measurements are;
| A | Shoulder to hem + allowance | Add a bit extra - it is easier to cut off than add |
| B | Waist | This is the narrowest part of the garment - there are gores and insets widening it at all other points |
| C | Waist to hem + allowance | Add the same amount extra as in A |
| D | Arm around elbow | For the Anglo-Saxon tunic this is important - it is designed to be tight-fitting, but you want to be able to bend your arm |
Once you've cut all the pieces, you start putting them together like a giant puzzle. You start with cutting up the middle of the front and back, from the floor to the waist. This is where you will sew your insets. Since the inset is a triangle, you'll find that the side is longer than the cut you just made. This is normal! You can even it all out when you pin the hem.
I usually start with the insets, because they are the trickiest part of the whole garment, and I like to save the easy bits until last. Oh, and keep track of which side is the right side! It's easy to get confused, and you will hate yourself if you put something on the wrong way!
Some things are easier done by hand, and the insets belong to that category! Trust me - sew the points in by hand, then continue the straight seams on the machine. There is too much material and too little room for it to fit in the sewing machine easily.
After that, I usually figure out what type of neckline I want and sew on the neck facing.
Put the side gores on, and there you have the body of the dress. Now for the sleeves.
The thing about under-arm gussets is that they are tricky to sew. I cheat, cut them on the diagonal, then machine sew them to the sides of the sleeves. After that, I sew the whole thing to the body of the dress. You end up with an enormous cross-shaped thing on the floor, resembling the picture. At this point you probably want to iron out the seams and give it a general tidy-up. Remember, this is the last time you'll have easy access to some of the seams. When you're done, just fold it over, and sew the sides.
There it is, now you get to hem the thing! I usually use every last bit of material for my dress, so I end up using facings for the hem. I don't buy the expensive commercial stuff, just use a narrow strip of scrap material that I sew on to the hem, and then handstitch flat. Yes, I know, but it really does look much nicer if it's done by hand!
You can use the same idea to make later type garb. I've used this principle to make a Cotehardie, with the difference that the sleeves were shaped, and the side gores were elongated to the arm rather than ending at the waist. I then pinned it all together and fitted the garment on the body, cutting away excess material.
Margareta Nockert - Bockstensmannen och hans dräkt (the bocksten man and his costume)
Margareta Nockert & Eva Lundvall - Bockstensdräkten (pattern)
Margrethe Hald - Ancient Textiles from Bogs and Burials
Crowfoot, Pritchard and Staniland - The Museum of London's Medieval Finds from excavations in London:4 ; Textiles and Clothing
Lady Muireann ingen Eoghain ua Maoil Mheaghna (Muireann ingen Owen O'Mulvany for the Gaelic impaired) is a 10th Century Ulster Irish. She is displaced in Cumbria, and spends much time cursing the Norse and the English. Not that does her much good.
Maggie Forest (previously Mulvaney) lives in Auckland, New Zealand. She spends much time cursing computers and networks. Not that it does her much good either.